We can't find the internet
Attempting to reconnect
Something went wrong!
Hang in there while we get back on track
Toggle Reference Track
by
Ledger
This tool gives you a simple way to reference your mixes against professional releases or other tracks for mixing/ compositional purposes.
For GUI use:
Open the GUI with either:
A) The Shortcut “Global:Tools:`TRT` Reference Track GUI”
Menu entries:
B) Instrument box: Toggle Reference Track GUI
C) Tools menu: Ledger`s Scripts >Toggle Reference Track GUI)
1. load up the wav sample of your reference mix, into a renoise instrument slot.
2. Click on [Create Reference Track] button
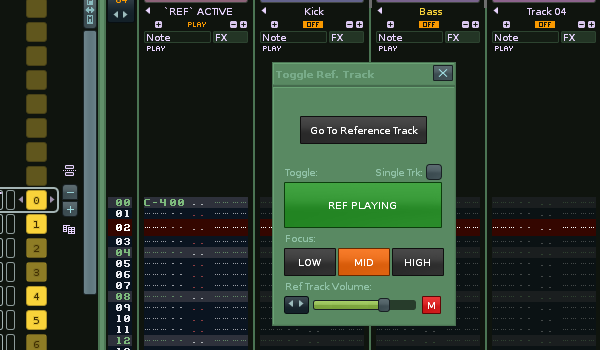
The active GUI should now appear. The [Create Reference Track] button changes into a [Go To Reference Track button]. You can toggle the reference track with your song with the [large Toggle button] (there is a checkbox for single track operation too)
You can now focus in on 3 frequency ranges (LOW, MID and HIGH) both your reference track and your song. These buttons control filters added to your ref track and the master track.
There is a volume slider underneath, controls the post volume of the reference track for easier balancing. Also an [M] button for mono-ing both your reference track and your song.
For Keyboard use:
1. First load up the wav sample of your reference mix, into a renoise instrument slot.
2. Right click on it in the instrument list and choose ~Create Reference Track from the menu.
A new track is created at position `track 01` and solo`d with the name `REF` ACTIVE (this will become `REF` MUTED on toggle)
The wav you just clicked will also have autoseek switched on now.
A C-4 is added to the first pattern to activate the wav.
3. Now you need to toggle this track relative to the rest of your song or another track, so there are the keyboard shortcuts:
Shortcuts:
`TRT` Toggle Reference Track
This will AB between the reference track and the rest of the tracks in renoise.
`TRT` Toggle Reference Track With Selected Track
This will AB between the reference track and the selected track in renoise.
————————————————————————————————————
The tool works by adding a gainer that is controlled with track mute states so even when you are soloing other tracks and adjusting your own mix, the reference remains silent.
The added track is automatically routed to the same destination as your master track so it bypasses master processing so you can get accurate AB testing.
If you don`t want to save giant wavs with each xrns you an either:
-delete the wav before saving (obvious but slightly annoying)
-cut the wav to a short section and loop it.
-Use a plug like eXT to host the wav - not sure of any free alternatives that will autoseek the timeline like XT does but would be very interested to know.
Extra Shortcuts:
`TRT` Adjust Song To Selected Sample Length
If you select a long sample and press this shortcut, the renoise song length will be adjusted by either adding empty patterns at the end of the song or deleting them to match the wav length. It will not delete any patterns with data in them though.
Can be used for a reference track wav or any other long wav you want to adjust the song length to. I`ve separated it from the creation of a reference track as you may not always want that to adjust your song length to what your referencing. Plus it may be a useful standalone shortcut when working with long wavs anyway.
`TRT` Toggle Autoseek On Selected Sample
shortcut which simply toggles the autoseek state of the selected sample. Saves going to instrument properties.
`TRT` Go To Reference Track
Will simply navigate you to the reference track .
`TRT` Toggle Mix Output Stereo To Mono
For quick mono-ing of a whole mix by use of a custom Stereo Expander called “Mono Mix”. It is added the Master track and the Reference track (if present).
This shortcut can be used without a reference track to just to check your mono compatibility while mixing.