Release Notes for Renoise 2.5.0
Just in time for a new decade, Renoise gets an upgrade from executive suite to penthouse with a panoramic view. The Renoise Pattern Matrix, both a bird's eye view and a song editor, is the missing link that pushes Renoise's unique approach to music composition to the next level. It's the perfect companion to the "eyes on the details" appearance and capabilities of the Pattern Editor.Renoise meta-devices (FX units that receive and transform parameters and other non-audio data) are now interconnectable across tracks. This opens the door to more modular approaches, like linking LFOs or key/audio signals all throughout your mix. Two new meta-devices round-up this "do anything" experience, giving the sound artist the freedom to connect and modulate all parameters with all others.That's just the beginning. Vastly improved MIDI mapping, automated rendering of plugin instruments to samples, a native guitar & bass amp simulator FX, performance optimizations, GUI improvements and much more...
Main Features
Pattern Matrix
In Renoise you build your song from the bottom up. The workflow is based on patterns, lines, and the details in between. Something that gives an overview from the top down, a birds eye of view of the song, has always been missing so far.
The new Pattern Matrix ingeniously solves this problem the Renoise way: without radically changing the nature of Renoise, the tracker.
Patterns and Tracks are divided into Blocks that can be moved around, providing the ability to manage the flow of the music instantly and easily. It's a natural evolution to the product, and quite frankly is just damn cool.
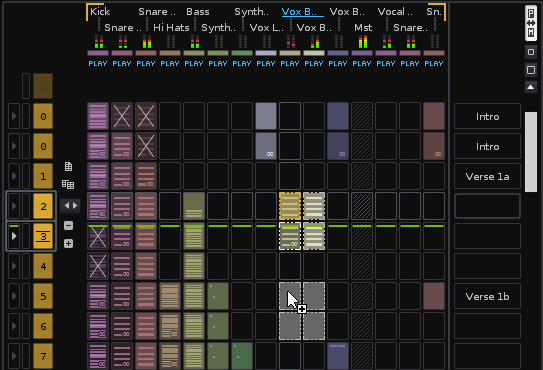
Here are some Pattern Matrix features at a glance:
- Overview of all notes in the song over multiple patterns (see what's happening in your song)
- Ability to select, drag & drop, copy, paste, clone and insert blocks into multiple tracks or pattern selections.
- Fully keyboard driven. It can be just like the pattern editor, if thats what you are into.
- Extension to the pattern sequencer, thus visible next to and with the Pattern Editor or Mixer
- Fully optional (no need to use it, when you don't need it)
- Ability to mute parts of your song, without the need to create new patterns, also useful when playing livesets to develop patterns in real time (create full arrangements or "drafts" from a single pattern with just a few clicks)
- User definable colors for tracks, which are also visible in other parts of Renoise (like the pattern editor) for better overview, grouping
- Resizable columns and rows lets you see more at once, or visualize more detailed content previews
- Easily see repeating content (automatically spot variations over multiple patterns)
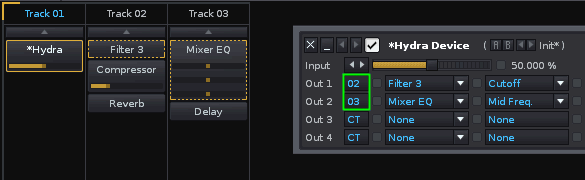
Cross Track Routing For All "Meta Devices"
Renoise's Meta Devices, effects that modulate/control other parameters like the "LFO Device" or "Hydra", can now be chained to parameters in other tracks.
This way you can control multiple devices on multiple tracks at the same time with a single slider (using our "Hydra Device" for instance). Or use a "Key Tracking" device to modulate parameters from key input in another track.
In essence, you can now connect & modulate all parameter with all others, making your tracks interact more deeply.
Vastly Improved MIDI Mapping
Nearly everything in Renoise can now be mapped to a MIDI controller. Start/stop buttons, patterns, tracks, sequence navigation or track muting/soloing... Anything you need in a live session, or simply want mapped, is easier than ever to achieve.
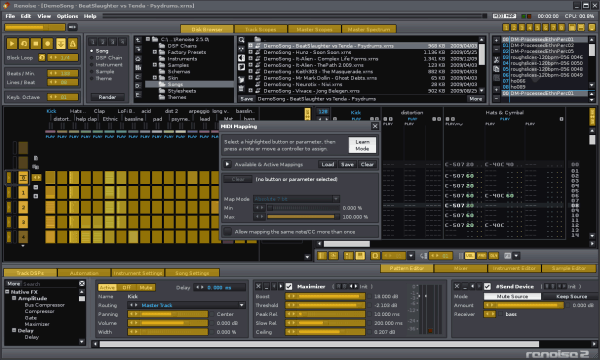
Besides being able to map more MIDI, there are also plenty of other improvements:
- Notes can now be mapped to parameters (e.g. switch a Cutoff value between two settings)
- A MIDI Note or Controller can be mapped to multiple parameters / actions in Renoise now (e.g. for cross fading - or mute/un-mute several tracks at once with one click)
- Context sensitive, intelligent mappings: You can set up mappings to do things with the currently selected device or track. This way you can use your MIDI controller hand-in-hand with the mouse or keyboard, and don't have to map every single parameter for every existing FX manually...
- New overview of already set up mappings with the ability to clear and remap/adjust existing mappings
Instrument Grabber
Just like Renoise's versatile "Render Selection To Sample" feature, the Instrument Grabber allows you to create sample based instruments from any VSTi or AU plugin instrument.
Extremely useful to free up your songs from plugin dependencies, or just to extend your sample library with sounds from your favorite plugin instruments.
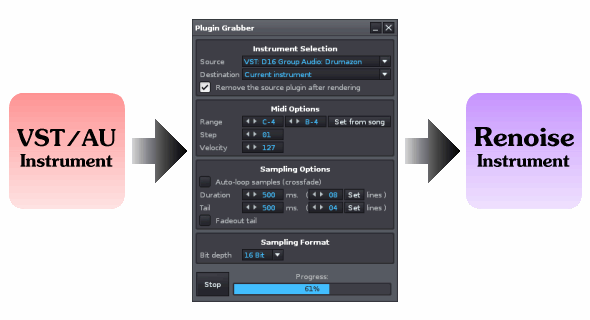
The instrument grabber features:
- replace or create multiple instruments with custom batch settings
- replace/unload the plugin instrument in the whole song, or create new instruments
- create single or multi-sample instruments from a range of notes with specified sampling step (specify how many samples to capture)
- smooth auto looping via crossfading, or a customizable note, tail duration with auto cropping and/or fading
A Bunch of New Internal Effects
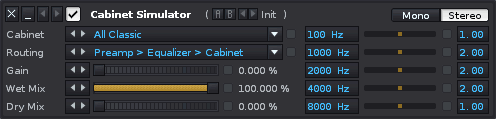
Cabinet Simulator Audio FX : A truly excellent, yet simple to use Guitar & Bass Amp simulator with 18 different cabinet models, a nasty tube, and an EQ. Highly recommended, not just for guitar or bass sounds.
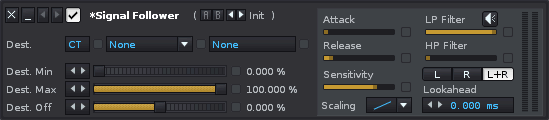
*Signal Follower Meta Device :
The Signal Follower listens to incoming audio from a track and transfers this signal to any automation parameter. This allows you to create sidechain like effects for !any! FX parameters, not just Compressors. Easily add Auto Wah-Wah effects and much much more.
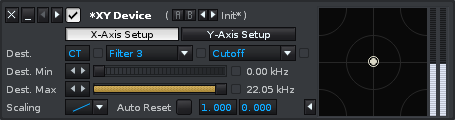
*XY-Pad Meta Device :
This device lets you link two parameters onto a sweet looking X/Y pad. In combination with "*Hydra" devices, this thing is extremely useful for preparing and performing Live sets.
And More...
Some Audio Engine Motor Oil
We've finished the transition from our legacy tracker tick base timing. These final transitionary optimizations have resulted in better overall performance of Renoise's Audio Engine (up to a 10% boost, maybe even 20% on some old machines like a G4). These changes also result in better standards compliance for VST/AU compatibility: The "static buffer" compatibility option for VSTs, AUs will less often be needed now.
Improved Plugin delay compensation
Renoise will now more accurately respond to real time playback, notes that you're playing/recording with your keyboard, while the song is running. This makes it much easier to record & improvise, even when using loads of delay causing plugins.
Audio Plugin Crash Guards for OSX
Just like on Windows, when a plugin does something bad, Renoise on OSX will try to recover from such disasters and show an error instead of letting the plugin crash the system. This way you can know which plugin caused a crash. You also get the chance to remove the buggy plugin and back up your song. Of course, this could also save your ass in a live gig...
MIDI Chord Mode Recording
Recording notes into patterns with the MIDI keyboard will now create chords, automatically. Just like when holding down the Shift key in the Pattern Editor to "enforce" chords.
MP3 Loading Support on Linux
On Linux you can now import MP3 files in Renoise with libmpg123. OGG, Flac and other formats don't need any external components installed. On OSX and Windows MP3 files have always been supported with Quicktime installed.
Loads of User Interface Cosmetics and Small Workflow Improvements
Renoise got a small face lift. It gives veterans a better overview and new users more consistent UI experience.
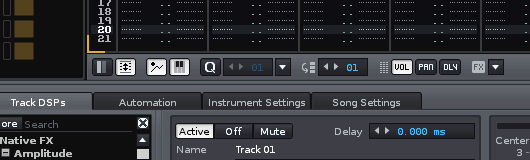
The most noticeable changes are the cleaned up transport panels. Additionally, Pattern related options & settings are now in a new bar next to the pattern. Rarely used functions are now in a new menu named "Options" at the top.
Some other GUI & Workflow related changes are:
- FX devices can now be minimized in the DSP chains
- Meta device routing (also for the new cross track routing) are now visualized in the mixer for the currently selected FX
- The sample recording dialog can now also be shown outside the sample editor
- Automation envelopes will now properly snap & show bipolar parameters
- All context menus got cleaned up, and you can also set/change the keyboard focus this way
- Double clicking on parameters name will reset the parameter to its default value
- Added "Save Sample" & "Save Instrument" shortcuts to the context menus (so you don't have to use the Disk Browser)
- Added Delete "Unused Tracks" and "Delete Unused Samples in Instruments" actions to the edit menu
- The keyboard preferences pane now has an "All" entry, which simply shows all mapped keys, independent from the focus
- You can now create up to 8 effects columns in the pattern editor
...a plethora of other small tweaks, here and there...