Release Notes For Renoise 3.0
Supercharged instruments
With Renoise 3.0, a lot of what makes Renoise special in the first place - the tracker interface, the flexible effects and routing - has now been integrated into its built-in sampler. This feature-set should make it interesting to sampling-library aficionados and synthesizer freaks alike.
Per-sample envelopes and effects
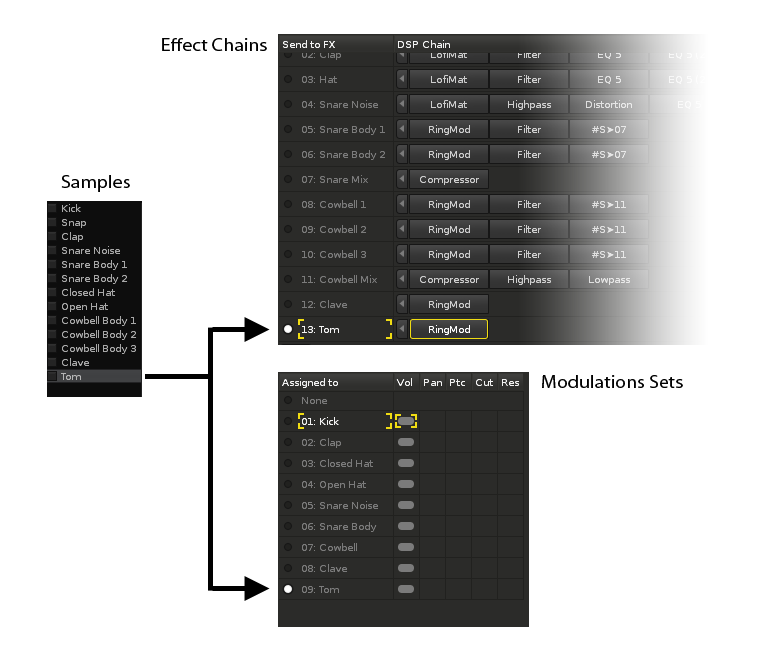
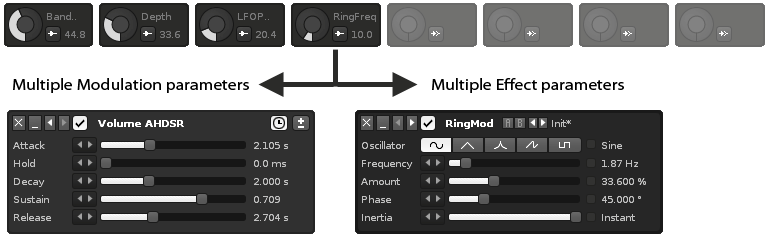
It is now possible to define unlimited envelopes (modulations) and create internal effect chains within instruments. And each sample can be freely assigned to any (one) modulation set or effect chain, as shown in this illustration:
Modulation Sets
As mentioned, you now have the potential to add envelopes on a per-sample basis. In fact, there’s a whole section dedicated to working with just modulation envelopes, using an approach similar to how DSP effects are processed: combining basic building blocks together to form more complex envelopes…LFO, ADHSR, Key/Velocity tracker, Fader etc.
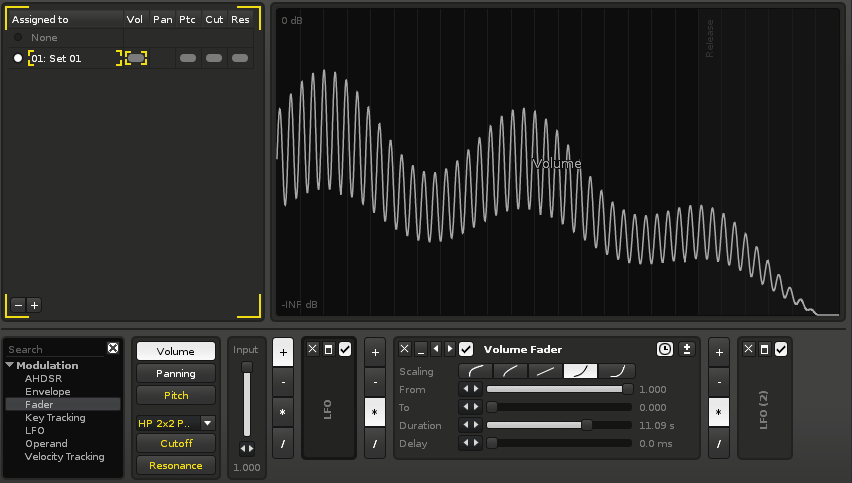
In the modulation screen, you will always see a real-time preview of the resulting modulation envelope. For example, the screenshot above displays the volume being controlled by the combination of two LFO devices with a gradual fade-out
Modulation chains are processed polyphonically (i.e. each voice is processed independently), and can be defined for each of the fundamental instrument aspects: Volume, Pitch, Panning and Cutoff/Resonance. Together, such a collection of fundamental aspects is called a “Modulation Set”, it forms the basic character of a sound and can be loaded and saved as a preset.
Effect Chains
The number of built-in effects in Renoise has grown over the years - everything from workhorse effects such as chorus, delays, EQ, etc., to the more specialized “meta devices”, which enable parameter routing between devices, and across tracks. Essentially, these effects are great for sound design and can transform any sound into something completely different.
This is why it’s such good news that any sample-based instrument will now be capable of harnessing that power too. You can create (any number of) internal effect chains, and assign a sample to any chain - including the ability to route between effect chains, exactly as you would do with tracks in Renoise.
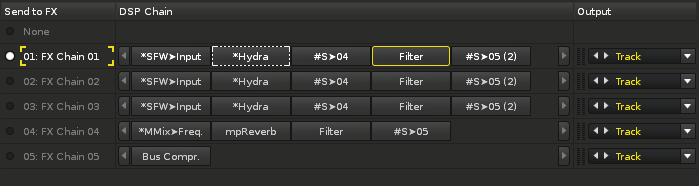
Apart from applying sparkle to the sound, Effect Chains double as a routing matrix. If your sound-card supports it, the audio signal within each chain can be routed to a different physical output.
Keyzones and overlapping layers
A common feature in many samplers will allow you to define groups of sounds that should be played randomly, or in a sequential order, each time a key is struck at a certain pitch and/or velocity. For example, an single acoustic snare might actually be made from four different recorded hits, each one sounding slightly different from the rest.
In Renoise, this is now easily achieved, simply by stacking your layers on top of each other, and then selecting among the playback modes: Random / Round-robin, Cycle or Play all (“Play All” being the default choice, and identical to how sample playback works in the previous version). This is great news for people who have a desire to create acoustic instruments with a more convincing, natural character.
New real-time performance options
Input Quantize: When recording notes into Renoise, you have always had the ability to quantize the time to a certain amount of lines. With Renoise 3.0, you can now also define the time resolution when playing instruments. This is obviously a huge improvement if you like to play a sound live, with crystalline timing precision. Possible quantizations include line, beat and bar.
MIDI Note Range: Also, the MIDI input for an instrument can now define a lower and upper note-range. This, along with the ability to link a certain OSC/MIDI port to your instrument, means that you can now achieve keyboard splits within Renoise itself (no more need to fiddle around with MIDI loopback devices).
Harmonic Scales: Furthermore, the instrument will also allow you to make use of harmonic scales. Common scales such as Harmonic Minor, as well as more exotic scales are available from a list, and applies to both the Sampler, Plugin and MIDI parts of an instrument. When you are recording notes, the currently selected scale is applied to those notes before they are written into the pattern.
Mute Groups is a well-known feature from MPC-style samplers. One of the most obvious uses for such a feature is when recording a drum kit with open and closed hihats - if you are aiming for a realistic sound, you would never want the open and closed hihat to play at the same time. In Renoise, this is now easily achieved by assigning the open and closed sample to the same mute group. The Mute Group feature will work with live playback of notes, but also as notes are manually entered into a pattern/phrase
The new Mono option replaces the global Chord Mode, and is defined per instrument. Otherwise, it’s essentially the same feature: it determines how the instrument will respond when you press multiple keys while recording. So, having Mono enabled for an instrument is not to be confused with how the mono feature might work on a soft-synth, you can still write chords into the pattern editor and all notes will play simultaneously. However, when playing and recording the instrument, the mono option is applied to the input.
Instrument phrases
Some people have dreamed of the day when you could attach a note-sequence to an instrument, and have the instrument play this melody in any pitch and tempo by a simple key press. The dream has now become reality, and we have chosen to call these note sequences “phrases” - created and edited using a scaled-down version of the pattern editor, located inside the instrument itself. Or, in other words:Yo Dawg! We heard you like trackers, so we put some trackers in your tracker!
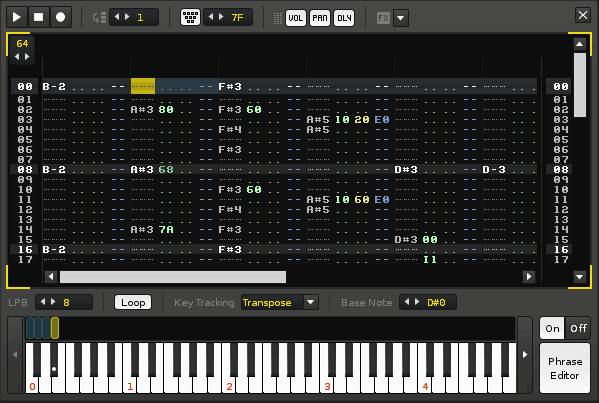
In the screenshot above, the lower four notes on the keyboard have all been assigned to phrases, and each one will play a different rhythm when triggered from your master keyboard, or via the pattern editor.
Staying true to the tracker tradition, you can combine these phrases with effect commands - play the rhythm backwards? Use the backwards command. From halfway in? No problem, use the slice command and target the exact line you want to play from. Throughout development, and perhaps just to make this powerful concept easier to grasp, a phrase has been thought of as if it was a sample - just full of notes instead of, well, samples.
Some key facts about phrases:- A phrase is referring only to samples within the instrument itself
- An instrument can contain a maximum of 120 phrases (one per key)
- The tempo (LPB) can be set independently of the global tempo in Renoise
- A phrase can be looped or un-looped (oneshot), maximum length being 512 lines
- If spread across multiple keys, a phrase can respond to the triggering note by changing the line offset or basenote (transpose) relative to the basenote of the phrase itself
- Will respect the instruments ‘tempo quantize’ setting for tempo-synced jamming
- Accepts most sample commands: backwards, volume/pitch-slide, offset etc.
- Easily create poly-rhythmic melodies using a few, differently sized phrases.
- Triggering a phrase can drive MIDI and Plugins too, with the usual limitations*
Instrument automation & macros
Perhaps the best thing about all of these new instrument features is, that you can control most parameters via automation, or map them directly to an external controller. In itself, the flexible solution for automating instrument parameters is done via so-called ‘macros’, of which you can define up to 8 per instrument:
But a macro is more than a simple rotary dial - it is powerful enough to control an unlimited number of independently weighted parameters. For example, a single macro could easily provide access to a filter in a synth preset, and - at the same time - change specific points of an amplitude envelope. For some inspiration on how to use macros, check out the all-new instrument pack which accompanies the Renoise download.
Reorganoised GUI
If you already know Renoise, the first thing you will notice in this release is that things have been shuffled quite a bit around. Here are some of the highlights:
- Entirely redesigned - and detachable - Instrument Editor
- Disk Browser now using full available height, can share space with Instrument List
- Instrument list pimped with visual feedback of playing instruments + additional icons
- Automation Editor + Track Scopes are vertically resizable
- Reorganized transport bar and generally speaking, simplified tabs + layout
- Instrument MIDI monitor can display/filter all incoming/outgoing messages
- Improved performance on Unix based platforms (esp. UI related stuff should feel much more responsive)
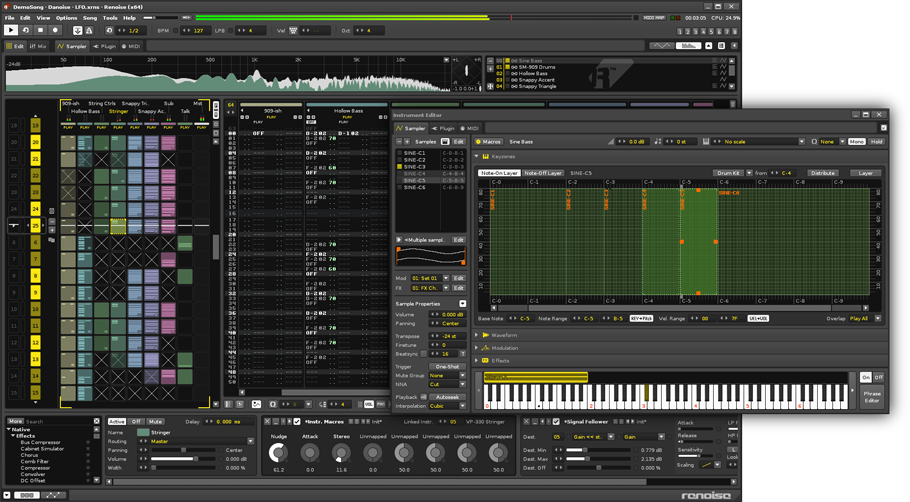
The Instrument Editor
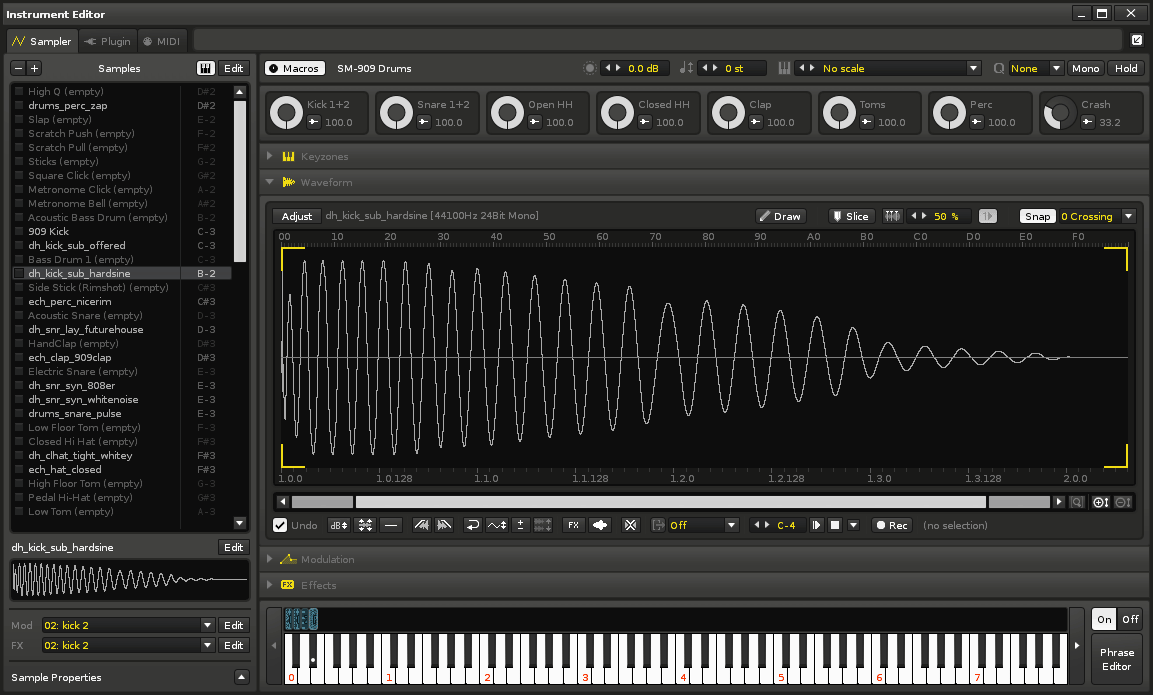
Perhaps most significantly, the instrument section is now completely self-contained, which allows it to be detached from the main window and put on a separate monitor or brought on top of the Renoise application - just like you would want with a plugin.
Also, the concept of a keyzone and a sample have now been merged together - creating multi-sounds (taking advantage of the keyzones) always felt a bit fiddly, as you would have to switch between pages in order to map the samples and control their properties. All samples/keyzones are now placed in a list on the left side, with quick access to the dedicated sub-sections (Keyzones, Waveform/Sample Editor, Modulation and FX) on the right.
The Main Application
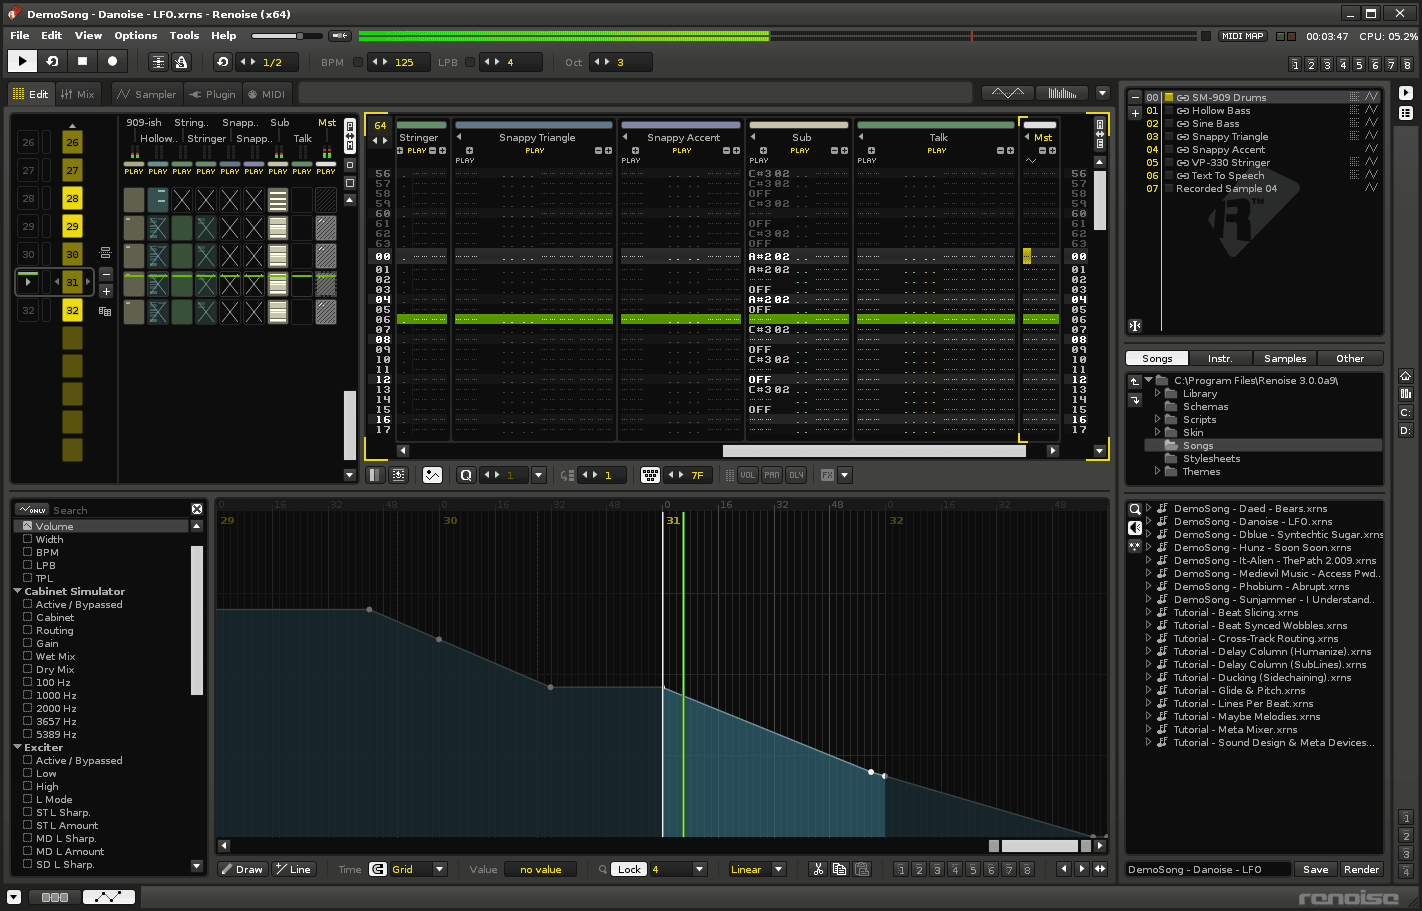
In the main interface, the Automation Editor and Track Scopes have both become vertically resizable - this should be especially useful when needing to perform precise automation envelope edits.
On the right side, the Disk Browser has been expanded to take up the entire height of the application. The added space should make it easier to browse vast quantities of samples or songs. The instrument list can be attached to the (upper part of the) Disk Browser, to allow more items to be displayed at once.
Some extra visual feedback has been added to the instrument list too - you can see which instrument(s) that might be playing at any time, as indicated by a small flashing square. And in the right side of the list, you’ll see a set of small icons - is it a plugin, a sample, or both? Clicking the icon will bring you right to the relevant part of the Instrument Editor.
New effect devices
We are happy to introduce a few new effect devices for this version, too.
The Doofer™ device is a new type of device that you can insert into any effect chain. It will effectively act as a wrapper for other devices, enabling you to bundle complex DSP chains within a reusable “shell”. Saving any combination of devices as a preset will make it turn up as a native effect device, which you can then insert anywhere, in any project you are working on. Renoise includes a number of pre-made Doofer™ devices to get you started.
The Convolver is a brand new, convolution-based effect which will allow you to load your own impulse response (IR) files. This can lead to many interesting results, such as treating your owns sounds to the crunchy digital character of a C64 snaredrum or the realistic recreation of an actual, physical space (such as a cathedral or a bathroom).
The Instr. Macro device is a simple meta-device, acting as a link between a track and any new-style instrument containing macros. It allows you to record automation data.
The Pattern Editor
A new effect command is the MaYbe command (0Yxx). It can be put into a note column or an effect column, and will allow you to trigger a note/line with a certain probability, or to define multiple notes and trigger just one of them with an independent probability factor (this is known as the “mutually exclusive mode”). For a great example of this command being put to use, listen to dblue’s tutorial/demo-song “Maybe Melodies”.
To make the control of note-pitch a little more powerful, the Glide (Gx) and Slide Pitch Up/Down (Ux and Dx) are now possible to enter into volume or panning columns, as well as effect columns. Also, the Glide command has received a little change in the way it works: entering the maximum possible value (0GFF for effect column or GF for volume/pan columns) will now cause the pitch slide to become instant.
Other tweaks and touches
- Scanning for changed/added MIDI devices on Windows without restarting the application
- DSP and modulation can be toggled on/off via graphical automation, via MIDI and via other Meta Devices
- Mixer: meta-device routings are visualized “in reverse” (selecting a device which is being controlled by another device will highlight the controlling device)
- Realtime Sinc interpolation: when re-pitched, each sample can now use one of four interpolation options: None/Linear/Cubic/Sinc
Holy ****, it’s time to check the backstage!
--
Oh, wait - one more thing … soon, we will introduce a new member of the Renoise family: a standalone plugin called Redux. For the first time - without resorting to tricks like Rewire - the sample-mangling capabilities of Renoise will be available to any DAW. And any instrument created in Renoise will be fully compatible with Redux, and vice versa.
If you are interested in learning more about Redux, or think you would be valuable as an alpha/beta-tester, you can subscribe to our Redux newsletter here